Setting Up IMAP Or POP - Entourage® 2008
If you would like to learn more about the differences between Post Office Protocol (POP) and Internet Message Access Protocol (IMAP), see the help topic, POP vs. IMAP.
For increased security we recommend that you use our Secure Sockets Layer (SSL) servers as detailed below.
NOTE: If your internal system configurations require non-SSL ports, see the Email Server Settings page for our full list of available servers and ports.
To set up Entourage for IMAP, do the following:
1. Click Entourage > Account Settings.
2. Click New.
3. Click the Account type list, and select IMAP.
4. Click OK.
5. On the Edit Account window, enter the following:
· Account Name—Enter a descriptive name for the account.
· Name—Enter your first and last name. This is the name that will appear in the From field of messages you send.
· E-mail address—Enter your entire email address (for example, myname@mydomain.com).
· Account ID—Enter your entire email address (for example, myname@mydomain.com).
· IMAP server—Enter the secure server name:
secure.emailsrvr.com
· Password—Enter the password for your email account.

· Click Click here for advanced receiving options located at the bottom of the Receiving mail section of the window. In the pop-up window, do the following:
a. Select the This IMAP service requires a secure connection (SSL) check box.
b. Ensure the IMAP port is: 993
c. Leave the Always use secure password check box unselected.

d. Click Close, located in the upper left corner.
· SMTP Server—Enter the secure server name:
secure.emailsrvr.com
· Click Click here for advanced sending options, located at the bottom of the Sending mail section of the window. In the pop-up window, do the following:
a. Select the SMTP service requires secure connection (SSL) check box.
b. Select the Override default SMTP port check box, and enter the secure outgoing port: 465
c. Select the SMTP server requires authentication check box.
d. Click the Use same settings as receiving mail server button.

e. Click Close, located in the upper left corner.
6. Click OK.
7. Click Close, located in the upper left corner.
To set up Entourage for POP, do the following:
8. Click Entourage > Account Settings.
9. Click New.
10. Ensure that POP is selected in the Account type list, and click OK.
11. On the Edit Account window, perform the following steps:
· Account Name—Enter a descriptive name for the account.
· Name—Enter your first and last name. This is the name that will appear in the From field of messages you send.
· E-mail address—Enter your entire email address (for example, myname@mydomain.com).
· Account ID—Enter your entire email address (for example, myname@mydomain.com).
· POP server—Enter the secure server name:
secure.emailsrvr.com
· Password—Enter the password for your email account.
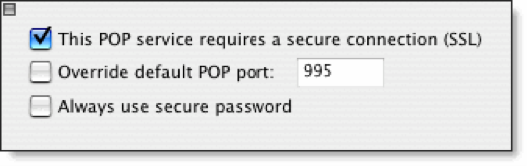
· Click Click here for advanced receiving options, located at the bottom of the Receiving mail section of the window. In the pop-up window, do the following:
e. Select the This POP service requires a secure connection (SSL) check box.
f. Ensure the POP port is: 995
g. Leave the Always use secure password check box unselected.
h. Click Close, located in the upper left corner.
· SMTP Server—Enter the secure server name:
secure.emailsrvr.com
· Click Click here for advanced sending options, located at the bottom of the Sending mail section of the window. In the pop-up window, do the following:
f. Select the SMTP service requires secure connection (SSL) check box.
g. Select the Override default SMTP port check box, and enter the secure outgoing port: 465
h. Select the SMTP server requires authentication check box.
i. Click the Use same settings as receiving mail serverbutton.
j. Click Close, located in the upper left corner.
12. Click OK.
13. Click Close, located in the upper left corner.
Leaving a Copy of Messages on the Server
A POP connection typically removes the email messages from the email server after you have downloaded new messages to your computer. If you would like to leave copies on the server, do the following:
1. Click Entourage > Account Settings.
2. Double-click your mail account, as it appears in the list.
3. Click the Options tab.
4. Select the Leave a copy of messages on the server check box.
5. To avoid exceeding your account’s storage limits, select the Delete messages from the server after . . . dayscheck box, and make changes to the days value, as desired.
6. You may also want to select the Delete messages from the server after they are deleted from this computercheck box. This will reduce the amount of storage you are using on your server.
7. Click OK.
8. Click Close located in the upper left corner.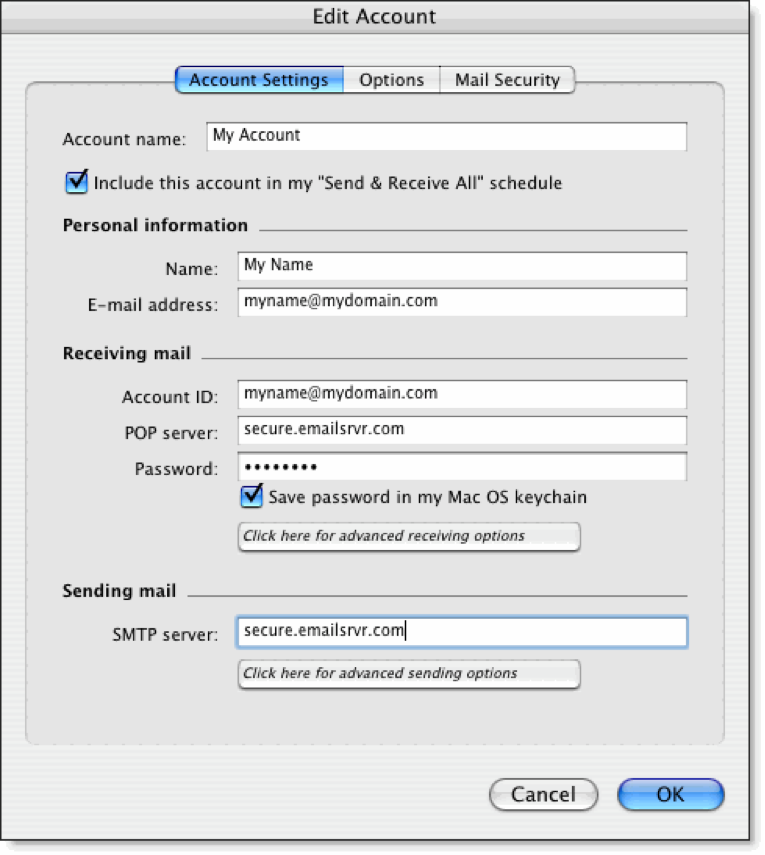
Related Articles
Setting Up IMAP Or POP - Thunderbird
If you would like to learn more about the differences between Post Office Protocol (POP) and Internet Message Access Protocol (IMAP), see the help topic, . For increased security, we recommend that you use our Secure Sockets Layer (SSL) servers as ...Setting Up IMAP Or POP - Outlook® Express
If you would like to learn more about the differences between Post Office Protocol (POP) and Internet Message Access Protocol (IMAP), see the help topic, POP vs. IMAP. For increased security, we recommend that you use our Secure Sockets Layer (SSL) ...Setting Up IMAP Or POP - Windows Mail
If you would like to learn more about the differences between Post Office Protocol (POP) and Internet Message Access Protocol (IMAP), see the help topic, POP vs. IMAP. For increased security, we recommend that you use our Secure Sockets Layer (SSL) ...Setting Up IMAP Or POP - Outlook® 2002 / XP
If you would like to learn more about the differences between Post Office Protocol (POP) and Internet Message Access Protocol (IMAP), see the help topic, POP vs. IMAP. For increased security, we recommend that you use our SecureSockets Layer (SSL) ...IMAP Vs. POP
If you are using an email address we provided and are setting up your email software (e.g., Outlook, Mac Mail, Entourage), you must indicate how you want to receive email using an IMAP or POP connection IMAP is quickly becoming the preferred method, ...